During this step, you'll create the online application form and configure standard form settings.
1. Log in to the campus portal as an administrator and access EX FormFlow - Forms.
2. Click Manage Forms. The Manage Forms page appears.
3. Click Add Form. The Add New Form pop-up appears. Example
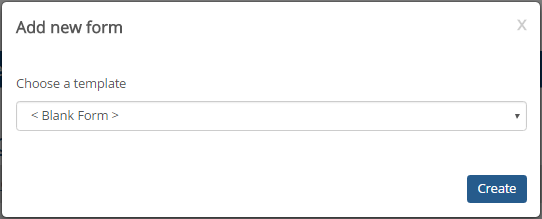
4. From the Choose a template drop-down, select online application.
5. Click Create. The Add New Form window closes and a standard online application form based on the Jenzabar-provided template is created with the online application tabs and questions. You can update, add, and remove tabs and questions as needed.
Update Basic Online Application Information
1. From the form toolbar, click Form Settings. The Form Information window appears.
2. The online application form automatically has the name of the imported file with the day and time it was imported. Use the Form Name field to update this to a name online applicants will recognize when they access the form link.
3. The template arranges the online application form tabs vertically. To change them to a horizontal layout, use the Tab Orientation drop-down.
4. Use the Description field to add information applicants may need. TIP: You can use @@ in this field to use a literal string replacer for looking up information.
Configure Online Application Form Settings
1. From the form toolbar, click Form Settings. The Form Information window appears.
2. Click the Settings tab. Example
3. To set up availability dates and times:
a. Click in the Display On field.
b. From the calendar that appears, select the date and time you want your form to be available to form users.
c. Click in the End On field.
![]() |
The End On field is required before users will be able to access the form. |
d. From the calendar that appears, select the date and time when you no longer want your online application form to be available to form users.
4. To make the form the only form available, select the Display in Main View checkbox.
![]() |
If the Display in Main View checkbox is checked, users will not be able to pick up where they left off on their previous form submission. Users will be forced to begin a new form submission. |
![]() |
If you have other forms you want to be available during the same time frame, do not select this option. |
5. To show a message to users before the online application form is available, enter it in the Message Before Start field.
![]() |
This information can let applicants know when the online application form will be available or provide contact information if they need assistance before the form is available. |
6. To show a message to form users when the event registration form is no longer available, enter it in the Message After End field.
![]() |
This information can let applicants know the registration form is no longer available, provide alternative instructions, or provide contact information if they need additional assistance. To display a message to users when the complete the form, enter it on the On Finish tab. |
7. If applicants will be uploading a file as a part of the application (e.g., a presentation), enter or update the JICS server location where files are stored in the File Upload Root field. Permits @@SubmissionID only.
8. If you want the form questions to appear in a different order each time someone accesses the form, select the Randomize Questions check box.
Set Up Form Completion Options
1. From the form toolbar, click Form Settings. The Form Information window appears.
2. Click the On Finish tab. Example
3. To use reCaptcha to validate users before the online application form is submitted, select the Use reCaptcha check box (This feature requires Google reCaptcha account. For more information see, Google reCaptcha). If you are not using reCaptcha, proceed to Step 4: Configure Submission Options.
![]() |
reCaptcha is a validation feature that ensures the form user is a human and protects your site from bots. |
a. In the Public Key field, enter the Google reCaptcha-provided public key.
b. In the Private Key field, enter the Google reCaptcha-provided private key.
4. To show a message to applicants once the form has been submitted, select the Display a Message to the User check box and use the field and formatting options to enter your message. TIP: Set up and/or insert datasources to pull up relevant information such as the applicant's name or phone number.
![]() |
Let the applicants know the form has been submitted, provide additional instructions, or contact information for more information. |
5. To send applicants to another website once the form is submitted, select the Transfer to Web Page check box and use the available field to enter the appropriate URL.
![]() |
Send applicants to your school's main website once they submit the form. |
Set Up Access and Security Options
1. From the form toolbar, click Form Settings. The Form Information window appears.
2. Click the Access/Security tab. Example
3. In the Number of Times a User Can Submit field, enter the total number of times you want to allow applicants to submit an online application. Once they reach that number and attempt to submit again, a notification message appears letting them know they have met the submission limit.
4. To remove all identifying information from the form's metadata, select the Make Submissions Anonymous check box. When an applicant submits their online application form, it will come in to EX as a guest user. This impacts metadata only. If your online application form includes user-identifying questions such as name, address, and contact information, it will be included on the application submission.
5. To let applicants access and review their online application, select the Allow Users to Review Their Own Submissions check box. The View Reports link will only let applicants see their own registrations. You can also set the application up so that applicants can create a temporary account, save their progress, and then log back into Forms to complete the application. See Enable Temporary Accounts for more information.
6. To limit people who can access the online application, select the data source that filters users who can access the form from the Limit Access to drop-down options. If the form user who is logged in does not exist in this list, the form link will not be available.
![]() |
This only applies to schools requiring applicants to have a JICS account before applying. If the applicant has a JICS account, you could limit the form to candidates who are applying for a specific major or school. |
7. Click Save.